
Reporte de buró de crédito - Personas Físicas por kiban
Step-by-step tutorial to be able to use "Buró de crédito" report consultation service with kiban credentials.
Introduction
Why use the service Reporte de crédito - Personas Físicas por kiban? With this service you will forget about making a contract on your side with the credit bureau, you will also forget about audits and the entire desk process that comes with hiring the service, you will only focus on consulting to evaluate your candidates.
In this guide, we will explain step by step how to execute the service Reporte de crédito - Personas Físicas por kiban. By the end, you will be able to successfully query the sandbox environment, and we will explain the entire process for making your query in sandbox or production environment.
Activate API keys
Remember that to run the kiban APIs you must have created your API Keys. We recommend following this guide 📘 https://docs.kiban.cloud/docs/api-keys#create-an-api-key to create API Keys for each of your environments.
Environments
Kiban has two environments to make requests to the available APIs.
- URL to execute requests to sandbox environment: https://sandbox.link.kiban.cloud/
- URL to execute requests to production environment: https://link.kiban.cloud/
Running the APIs in the sandbox environment is free, unlike the production environment, which generates costs.
NIP Process
In order to execute the query, you must have the authorization of the person consulted, for this reason the NIP process must first be executed, through which the person consulted will receive this 6-digit NIP, with which the query will be authorized of your credit information.
The consultation of the person's credit information will be authorized through this 6-digit NIP which can be received by different ways.
The set of APIs that will be sent will be those defined in this link https://docs.kiban.cloud/reference/nip-bureaus.
Step 1 - Send NIP
The first API to execute will be the send NIP API. We recommend you to review the documentation for this API to understand the request that will be applied.
With this API you can make 3 types of requests, it will be your decision to choose which way you want to use to send the NIP.
The possible examples of NIP sending are the next:
{
  "method": "email",
  "email": "[email protected]"
}
{
  "method": "sms",
  "countryCode": "+52",
  "to": "9999690335",
  "message": "Tu nip es {{nip}}"
}
{
  "method": "whatsapp",
  "countryCode": "+52",
  "to": "9999690335"
}
If SMS is selected, the example cURL to be executed is the following.
curl --request POST \
     --url https://sandbox.link.kiban.com/api/v2/nip/send \
     --header 'accept: application/json' \
     --header 'content-type: application/json' \
     --header 'x-api-key: MY_API_KEY' \
     --data '
{
  "method": "sms",
  "countryCode": "+52",
  "to": "9999690335",
  "message": "Tu nip es {{nip}}"
}
'
Regardless of the selected method, if the request is correct, the service will return an HTTP code 200. At that time, the NIP will be sent to the user using the selected method.
In this response you will also retrieve an id, you must store it because this id will be used in the next API to be executed.
Step 2 - First validation
The second API to execute will be the NIP validation API. We recommend you to review the documentation for this API to understand the request that will be applied.
In order to run this API, you must ask your clients to provide you with the NIP they received. Once you have it, you must run this API to apply the first validation.
NIP in sandbox
Remember that in the sandbox environment we do not send a NIP, so you must place in this field the consecutive numbers from 1 to 6 (123456) to simulate the NIP sent.
When you already have the NIP that your client received, you must execute the following cURL, the parameters to send will be the Identifier recovered from the previous step and the NIP that was sent to the client.
curl --request POST \
     --url https://sandbox.link.kiban.com/api/v2/nip/validate \
     --header 'accept: application/json' \
     --header 'content-type: application/json' \
     --header 'x-api-key: MY_API_KEY' \
     --data '
{
  "id": "645590bf0f24ca7ebfc6580d",
  "nip": "318958"
}
'
This first validation will return a JSON similar to the following, in which we will see the attempts that have been executed. The most important field to consider is the id, because this id will be used later.
{
  "id": "6494f34ba63a8326b82930c6",
  "createdAt": "2023-06-23T01:31:36.843043126Z",
  "finishedAt": "2023-06-23T01:31:37.179537427Z",
  "duration": 336,
  "status": "SUCCESS",
  "request": {
    "id": "6494f349a63a8326b82930c2",
    "nip": "476206"
  },
  "response": {
    "attempts": [
      {
        "createdAt": "2023-06-23T01:30:14.471314278Z",
        "nip": "241183",
        "status": "fail"
      },
      {
        "createdAt": "2023-06-23T01:31:36.899681719Z",
        "nip": "476206",
        "status": "success"
      }
    ]
  }
}
Step 3 - Second validation
The third API to execute will be the same as the previous step, the NIP validation API. We recommend you to review the documentation for this API to understand the request that will be applied.
This API must be executed again in this step because Buró de Crédito requires you enter the code twice. The URL and the body will be exactly the same, essentially repeating the same request twice.
curl --request POST \
     --url https://sandbox.link.kiban.com/api/v2/nip/validate \
     --header 'accept: application/json' \
     --header 'content-type: application/json' \
     --header 'x-api-key: MY_API_KEY' \
     --data '
{
  "id": "645590bf0f24ca7ebfc6580d",
  "nip": "318958"
}
'
This second validation will return the same JSON as the previous step, only this time we will see more steps executed, a new parameter called validated, which will have the value of true, that means that the request has already been authenticated.
{
  "id": "6494f34ba63a8326b82930c6",
  "createdAt": "2023-06-23T01:31:36.843043126Z",
  "finishedAt": "2023-06-23T01:31:37.179537427Z",
  "duration": 336,
  "status": "SUCCESS",
  "request": {
    "id": "6494f349a63a8326b82930c2",
    "nip": "476206"
  },
  "response": {
    "attempts": [
      {
        "createdAt": "2023-06-23T01:30:14.471314278Z",
        "nip": "241183",
        "status": "fail"
      },
      {
        "createdAt": "2023-06-23T01:31:36.899681719Z",
        "nip": "476206",
        "status": "success"
      }
    ]
  }
}
As indicated in the previous step, the important value to recover is the id, this identifier is the one that should be used in the next execution.
Request Reporte de crédito - Personas Físicas por kiban process
After having executed the NIP process, it is now possible to execute the Credit Report query - Individuals by kiban.
The API to execute will be the Reporte de crédito - Personas Físicas por kiban API. We recommend you to review the documentation for this API to understand the request that will be applied.
In the documentation you can see the different examples to make a request. If we take the example with only the mandatory parameters, the cURL request to be executed will be the following:
curl --request POST \
     --url 'https://sandbox.link.kiban.com/api/v2/bc_pf_by_kiban/query?testCaseId=663567bb713cf2110a110689' \
     --header 'accept: application/json' \
     --header 'content-type: application/json' \
     --header 'x-api-key: MY_API_KEY' \
     --data '
{
  "parameters_bc_pf_by_kiban": {
    "productoRequerido": "501",
    "hawk": true
  },
  "nombre": {
    "apellidoPaterno": "KIBAN",
    "apellidoMaterno": "CLOUD",
    "primerNombre": "LINK",
    "segundoNombre": "API",
    "rfc": "KIBA900129RW9"
  },
  "domicilio": {
    "direccion": {
      "direccion": "Av Paseo de la Reforma 403",
      "cp": "06500"
    }
  },
  "authorization": {
    "tipo": "nip",
    "id": "645a74e7dda9781161e787b"
  }
}
'
Regarding the structure of the authorization object, the parameters to be sent will be the following
- tipo, it will be mandatory to send nip in this field.
- id, send the id that was retrieved in the response from Step 3 - Second validation.
Successful request
If you followed each of the previous instructions step by step, when you execute the API of this step, you will successfully obtain the credit report of the person consulted
Configuration to use in production
At the beginning of this guide we indicate the URLs to execute according to the environment you require.
In order to run the service "Reporte de crédito - Personas Físicas por kiban", in production, you must carry out a configuration process, this process is described also in our knowledge center.
Configuration
To use these APIs, you must complete the configuration process that Buró de Crédito requires from kiban. This process consists of sharing screen prints, sketches or mockups of your views:
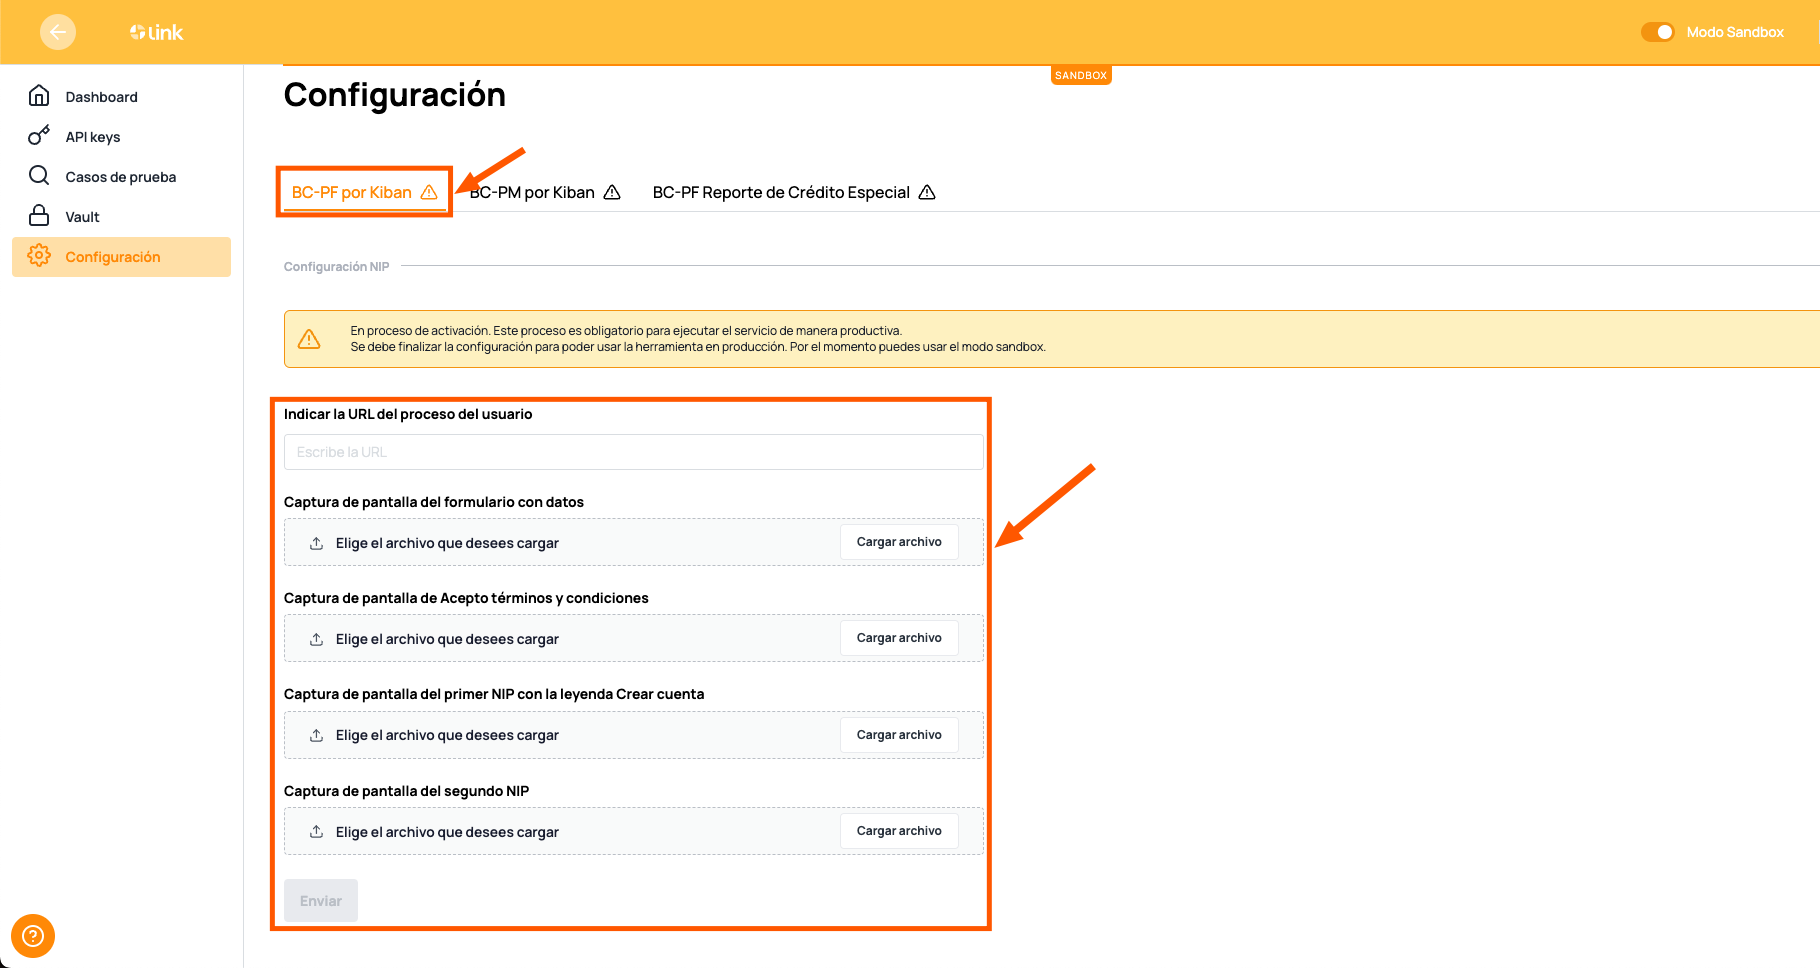
The requested fields are the following:
- Indicar la URL del proceso del usuario. If it is a web process, a public URL must be indicated to access the service
- Captura de pantalla del formulario con datos. Upload an image showing the form where the user's data is requested to consult it
- Captura de pantalla de Acepto términos y condiciones. Upload an image showing that the user is accepting the terms and conditions of consulting their credit report.
- Captura de pantalla del primer NIP con la leyenda Crear cuenta. Upload an image showing the process for the clients to upload the NIP they received
- Captura de pantalla del segundo NIP. This field is optional because only one NIP is sent, but if you want to load it in the configuration, an image must be uploaded showing the process so that the client can reload (repeat) the NIP received.
Configure your service
Remember that you must complete this configuration in the link tool, otherwise you will not be able to run queries in the production environment
After you upload what you requested, someone from kiban will be in charge of validating the data. If we detect that it does comply with what was requested, we will activate your account so that you can make queries in production.
Updated 4 months ago