
Guide to connect workfloo via API
How to connect workfloo via API
In this guide you will find all the steps to integrate workfloo into your system via API.
It will be explained how to connect to a wokfloo that contains the following steps:
- Form.
- NIP process to authenticate the call to the credit bureau.
- Query to credit bureau.
- A decision tree.
If you follow all these steps, at the end of the guide you will have a connection via API to your system.
First step - Have your workfloo set up
Before any call you must have created your workfloo on the kiban cloud platform. In order to perform the configuration, we share with you our knowledge center link where we explain how to create a workfloo.
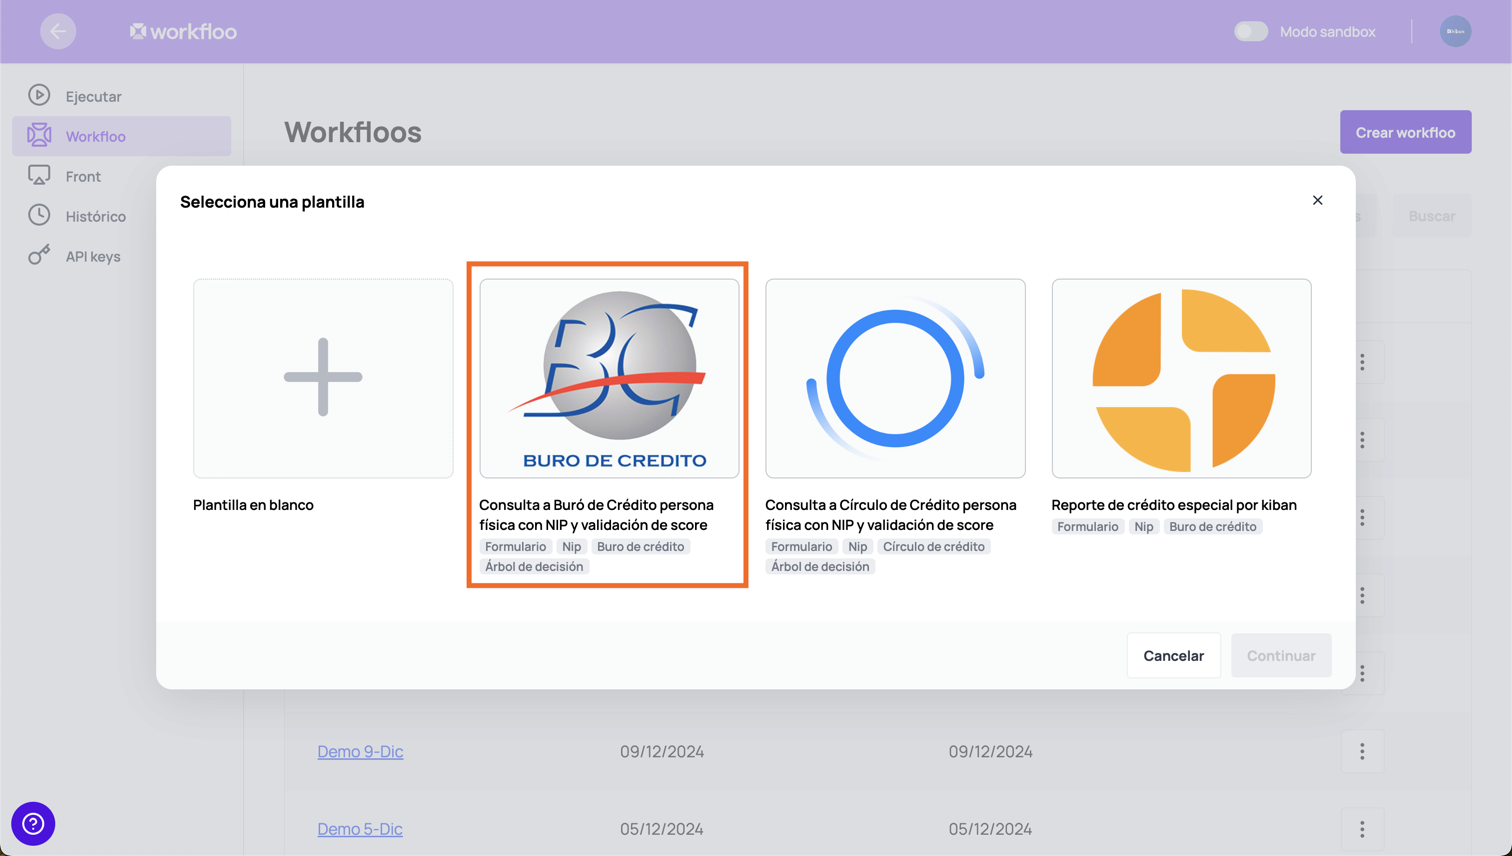
You can use the workfloo templates
Remember that you can use a preloaded template in workfloo, this automatically adds the steps of a chosen service without having to configure them manually. We share with you this link from our knowledge center where it is explained how to create a workfloo from a template.
In this guide we will use the template "Consulta a Buró de Crédito persona física con NIP y validación de score" to exemplify API requests.
Publish your workfloo
Remember that in order to consume your workfloo, it must be published with a version. We share with you the following link from our knowledge, where you can see the details to publish a workfloo.
Workfloo created
Once you have created and configured your workfloo, you will have something like the following:
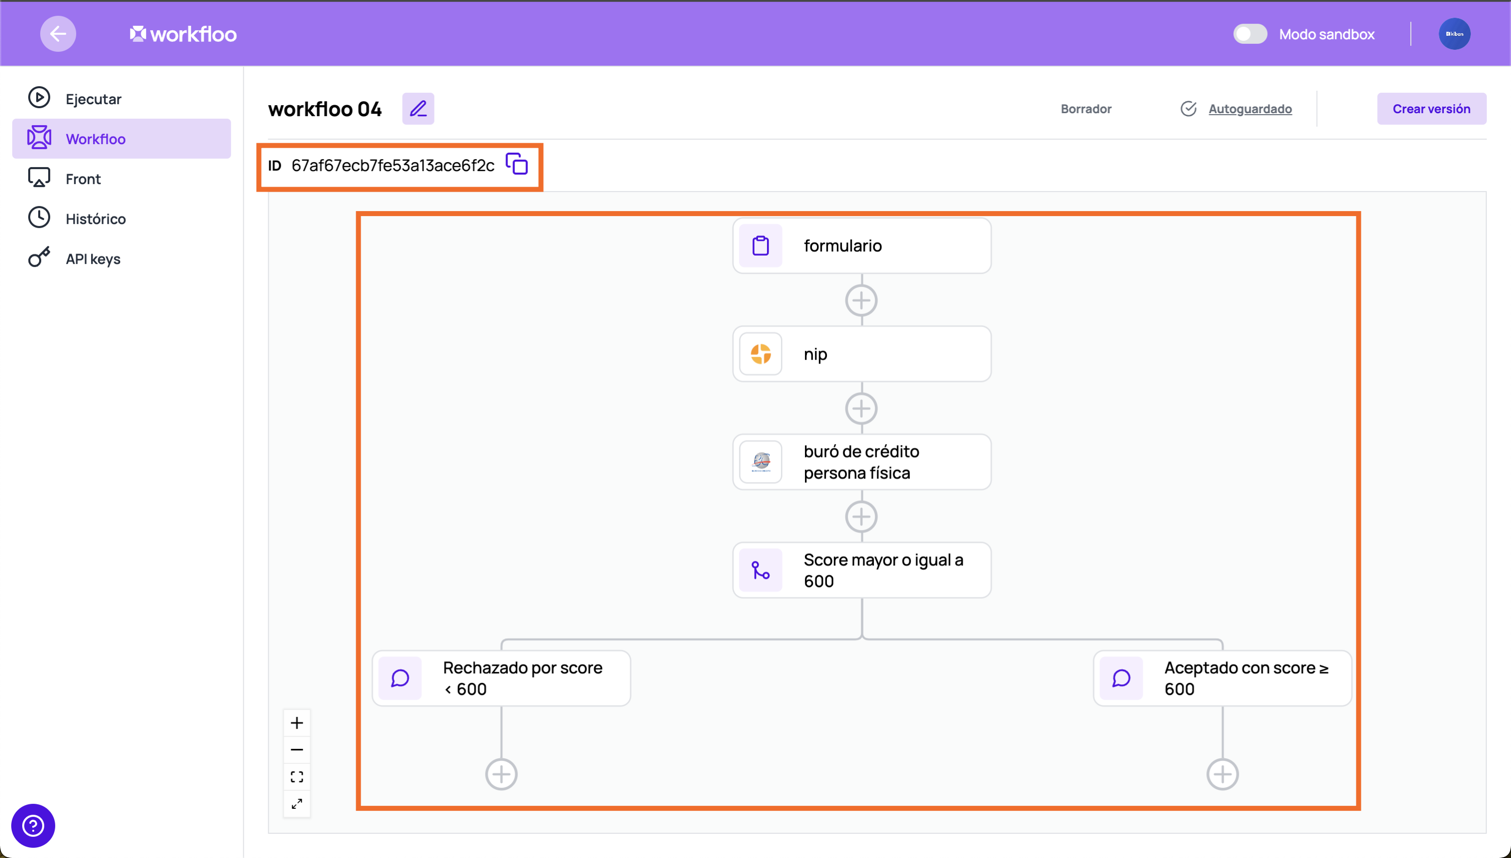
Get the workfloo id
The ID indicated in the image above will be the id required for your API queries.
Second step - Create a test scenario
We recommend that before consulting in production, you do tests in the sandbox environment, for this it is necessary to create a test scenario in workfloo, for more information on how to create a test scenario we suggest you visit our knowledge center link.
Test scenario created
Once you have created and configured your test scenario, you will have something like the following:
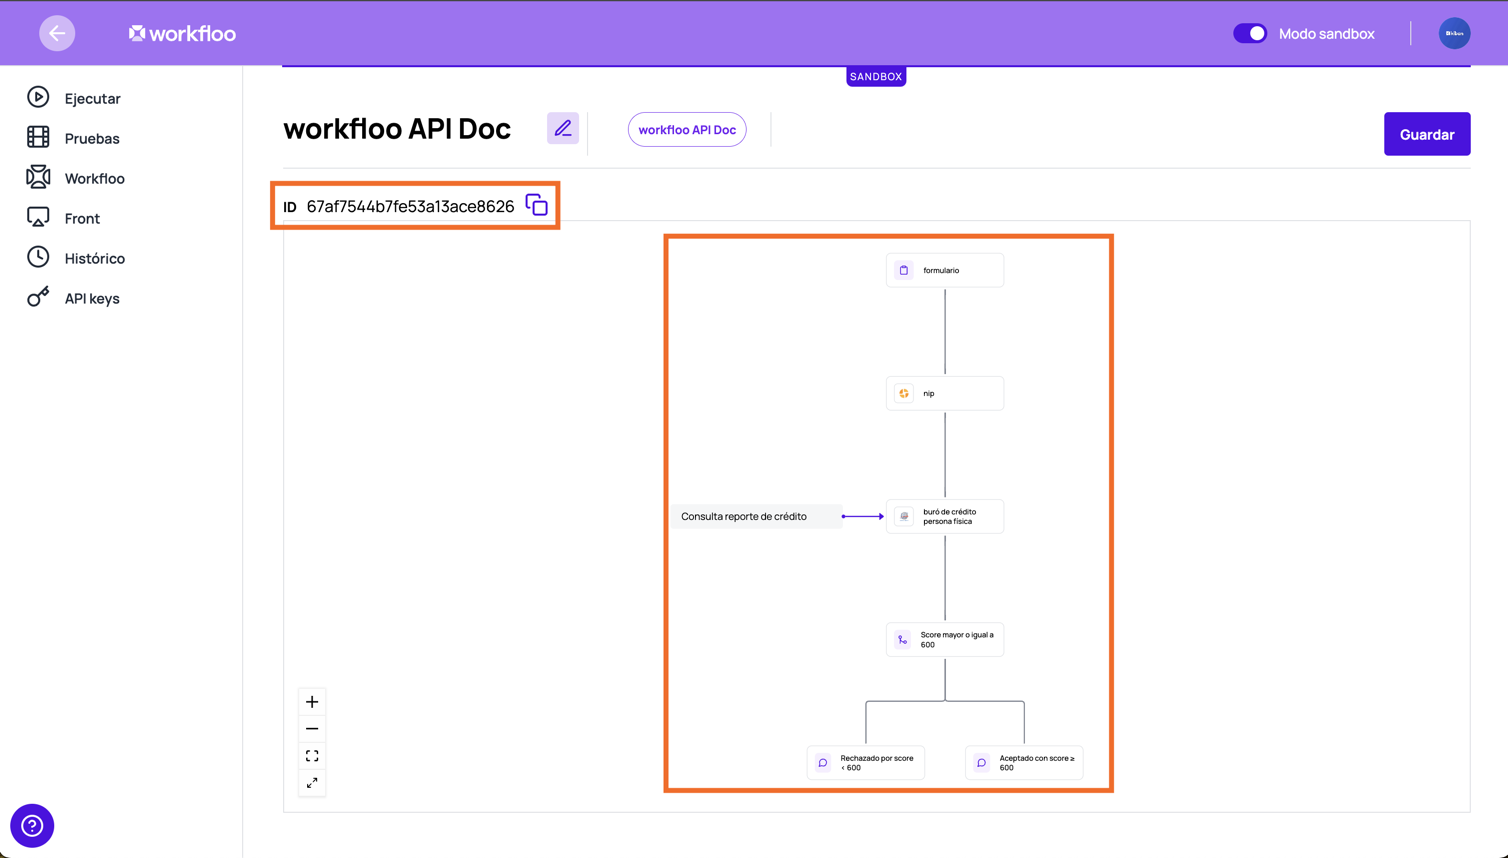
Get the test scenario id
The ID indicated in the image above will be the id required for your API queries in sandbox environment.
Third step - API key and environments
To authenticate your API requests to workfloo, you need an API key. Create an API key to access and use workfloo's services. For more information on how to create API keys we suggest you visit our knowledge center link.
Environments in workfloo
Workfloo has two environments
- Sandbox: https://sandbox.workfloo.kiban.com/
- Production: https://workfloo.kiban.com/
Fourth step - Execute a workfloo
To execute a workfloo, the Execute a workfloo API must be consumed.
Request
The CURL Request example is as follows:
curl --request POST \
     --url https://sandbox.workfloo.kiban.com/api/v1/workfloo/ \
     --header 'accept: application/json' \
     --header 'content-type: application/json' \
     --header 'x-api-key: YOUR_API_KEY' \
     --data '
{
  "idWorkflooDefinition": "657117e1d511b6e54fe2a967",
  "scenarioId": "6571181fd511b6e54fe2a968"
}
'
where
- idWorkflooDefinition must be the id workfloo, see workfloo created.
- scenarioId must be the test escenario id, see test scenario created.
Response
You will receive a response with http code 200 and the execution workfloo Id that you will use later.
{
  "id": "64a8b71a2742c68c504bbc0c"
}
Fifth step - Execute a form
Pauses in workfloo
When a workfloo runs, it automatically progresses through its steps. However, it may pause at certain steps that require user input to continue. These pauses occur when the workfloo needs specific information from the user, keeping it in a "Progress" state until the required data is provided. These steps may include filling out:
To execute a form you must execute the API defined in this link. This is the API to send the data of the person to be consulted.
Request
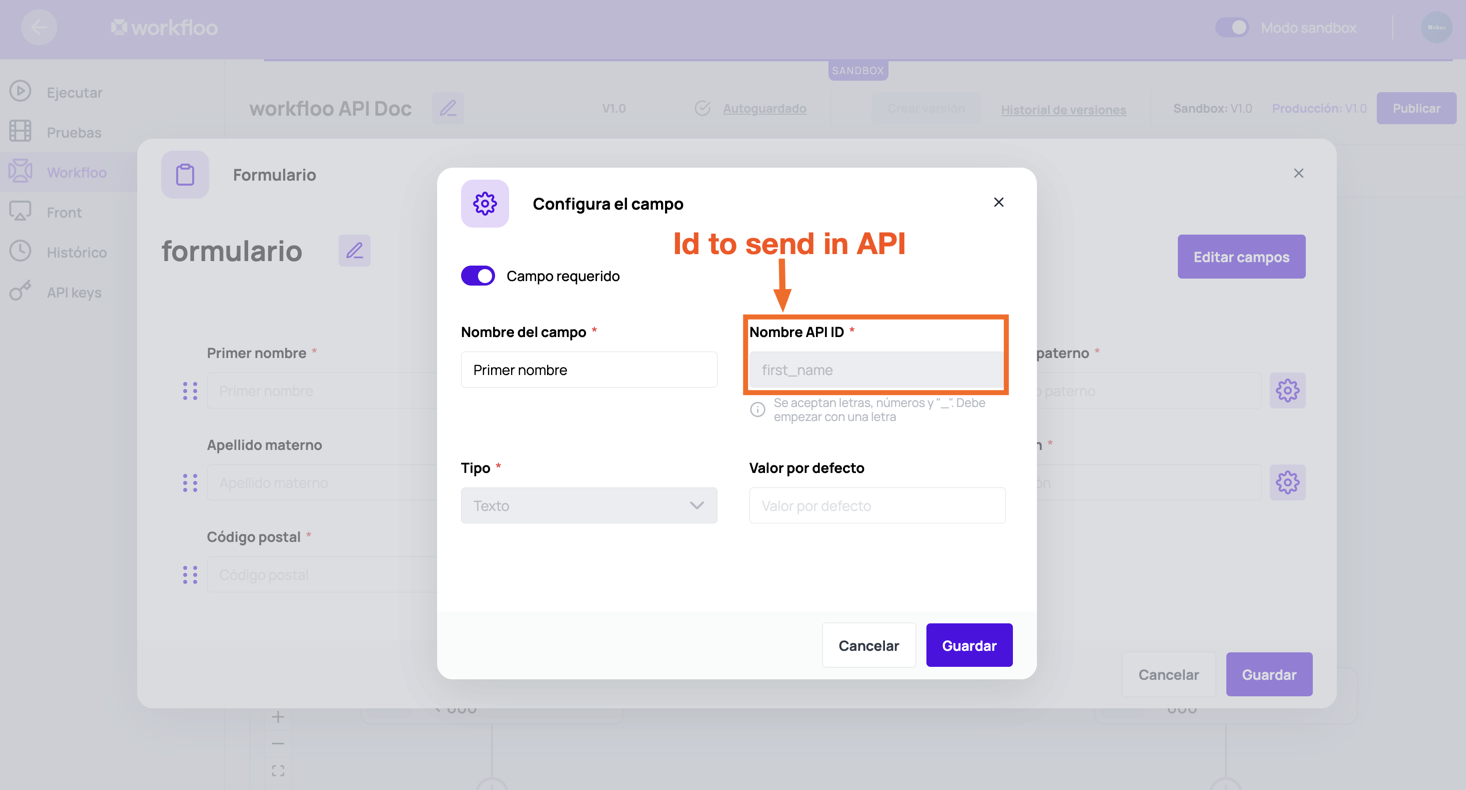
In order to make a query you need to know the IDs of each field in your form so you can send them in the request.
To obtain these IDs you must access the form, click on each of the Configuration buttons and select the Edit option, as shown below:
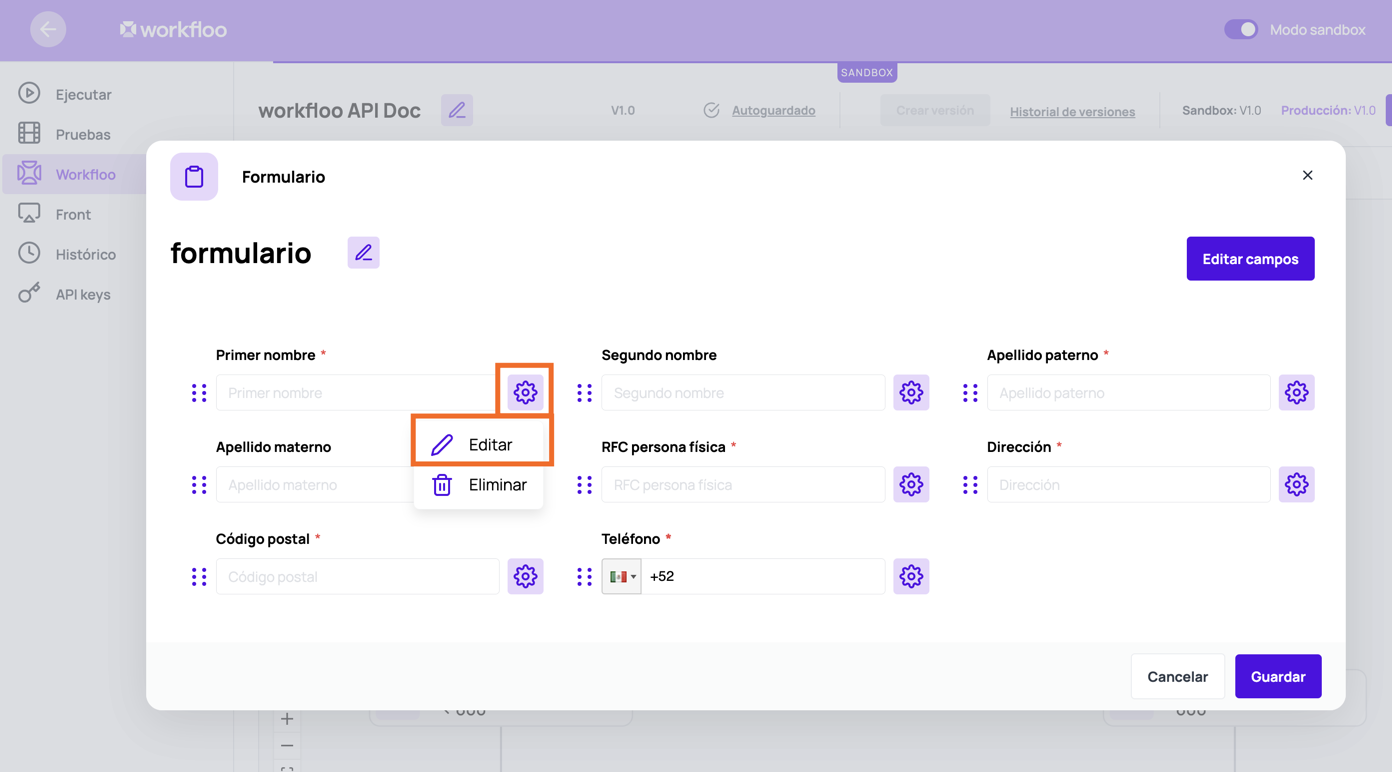
In the edit section, you will be able to see the form fields, at this point you will see the name of the API ID, which you must use to send in your request.
The following CURL is an example of the request:
curl --request POST \
     --url https://sandbox.workfloo.kiban.com/api/v1/workfloo/workflooId/form \
     --header 'accept: application/json' \
     --header 'content-type: application/json' \
     --header 'x-api-key: YOUR_API_KEY' \
     --data '
{
  "first_name": "FIRST",
  "second_name": "SECOND",
  "last_name_1": "KIBAN",
  "last_name_2": "CLOUD",
  "country_code": "+52",
  "phone_number": "5555555555",
  "rfc_pf": "KIBA801010BPA",
  "address": "AV PASEO DE LA REFORMA 403",
  "postal_code": "06500"
}
'
In the URL you must replace the path parameter workflooId with the ID recovered in the Execution step. You must also send each of the IDs of the fields in your form in the body, with their value in the defined format.
Response
You will receive a empty body response with just the http code 200.
Sixth step - Send NIP
The NIP process consists of a series of API executions that involve sending and validating a NIP to authenticate credit bureau queries. This step is responsible for delivering the NIP to the client according to the configuration of the Workfloo NIP connector.
You must execute the API defined in this link. This is the API responsible for send the NIP to the client.
Request
Since the data is retrieved from the connector's definition, the request must be sent without a body, as the information is taken from the configuration.
The following CURL is an example of the request:
curl --request PATCH \
     --url https://sandbox.workfloo.kiban.com/api/v1/workfloo/workflooId/nip/send \
     --header 'accept: application/json' \
     --header 'x-api-key: YOUR_API_KEY'
In the URL you must replace the path parameter workflooId with the ID recovered in the Execution step.
Response
Once this API is executed, the client will receive a 6-digit NIP which must be provided to authenticate the query. In the API response You will receive an empty body response with just the http code 200.
Seventh step - Validate NIP
The next step is the NIP validation process. This must be applied once the client has received the NIP and provided it. You must execute the API defined in this link.
Execute two times this API
This endpoint must be executed 2 times to validate the NIP before querying a SIC. For details visit the NIP validation API.
Request
The following CURL is an example of the request:
curl --request PATCH \
     --url https://sandbox.workfloo.kiban.com/api/v1/workfloo/workflooId/nip/validate \
     --header 'accept: application/json' \
     --header 'content-type: application/json' \
     --header 'x-api-key: YOUR_API_KEY' \
     --data '{"nip":"123456"}'
In the URL you must replace the path parameter workflooId with the ID recovered in the Execution step.
In the body you need to send de NIP that the client received.
Response
First validation response:
{
    "phase": "VALIDATE_2"
}
Second validation response:
{
    "phase": "VALIDATED"
}
End execution
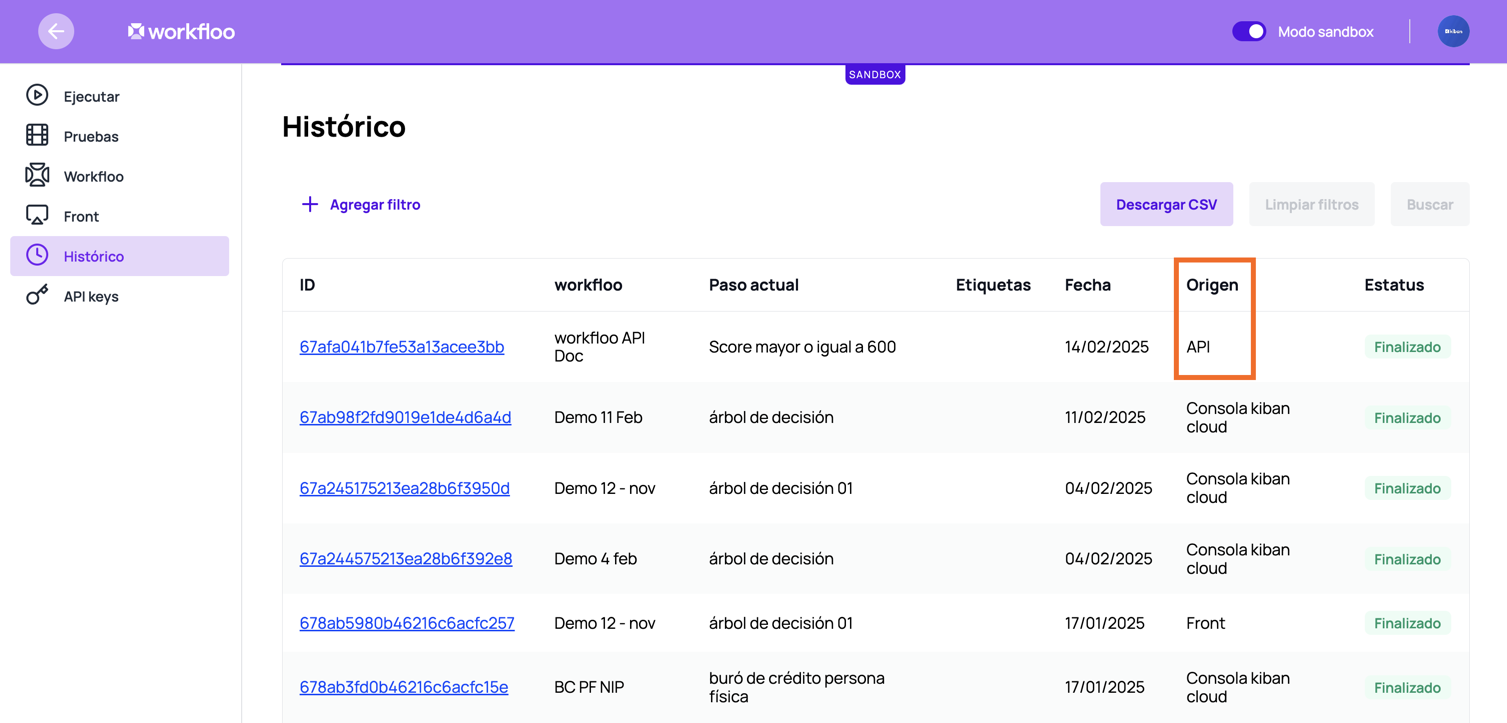
As mentioned in previous steps, a workfloo's steps are executed automatically unless it reaches a step that requires user input. At this stage, your workfloo execution is complete, as the remaining steps—Bureau Query and Decision Tree—run automatically.
If you check your history in kiban cloud console, you'll see a historic similar to the one below, where you can confirm that the API execution was successfully completed.
Get Response
You can retrieve the complete execution details of a Workfloo via API, including all executed steps in JSON format. To do this, use the Get Workfloo by ID endpoint, You just need to provide the Workfloo ID.
Pooling
One of the ways to validate that the automatic execution of the workfloo has already finished is by executing the "Get workfloo by ID" service and validating the general status in the response.
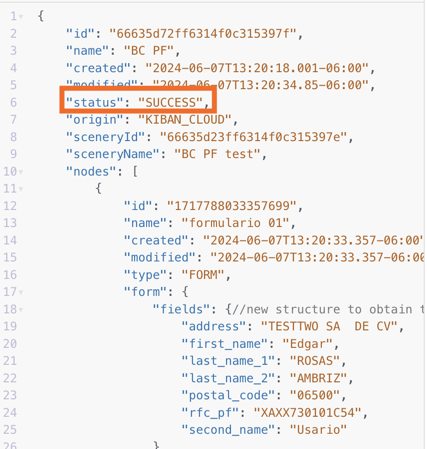
If the status is SUCCESS it means that the execution ended successfully, so you can pool to this endpoint until this status is recovered.
Add notification via API
If you don't like consuming resources by pooling (you're one of us) we suggest adding an API type step at the end of the workfloo as shown in the following image:
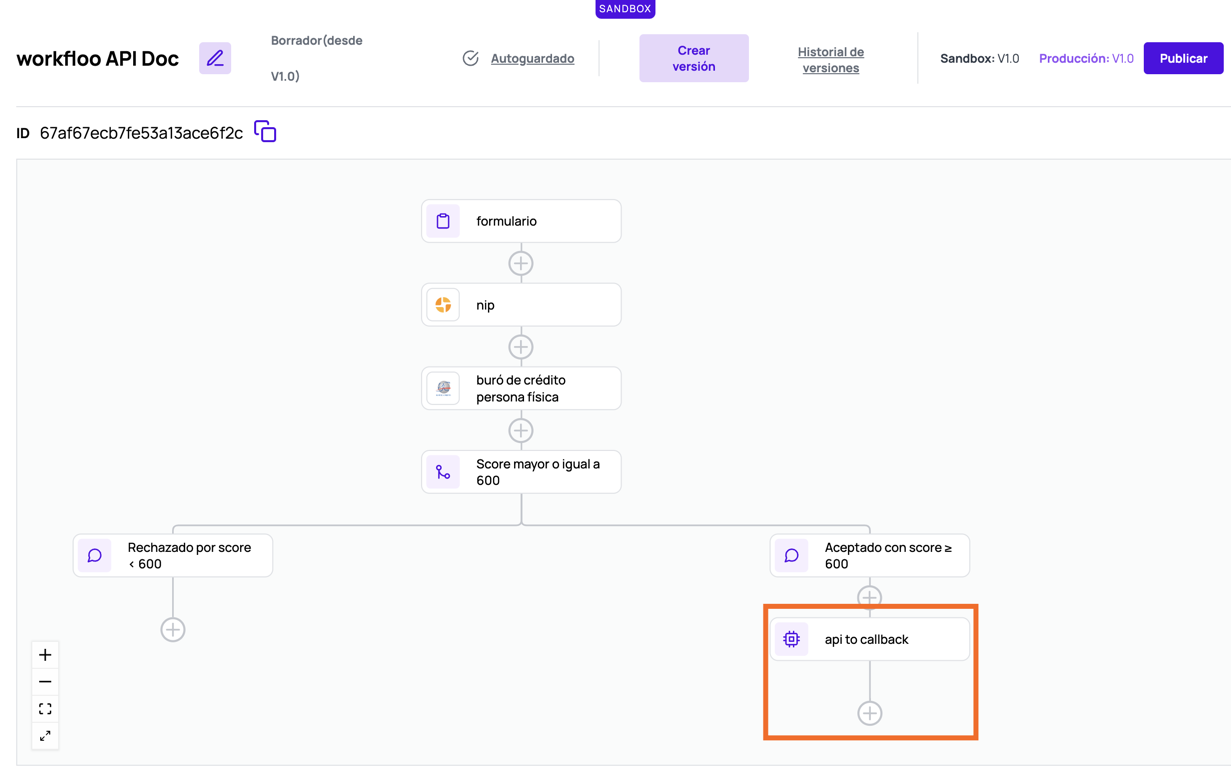
With this step you can send a callback to one of your services, where you can send notifications to indicate that the execution has finished and you can perform a next action on your side. To add this step to your workflow we suggest you see the following API connector link.
Updated 3 months ago